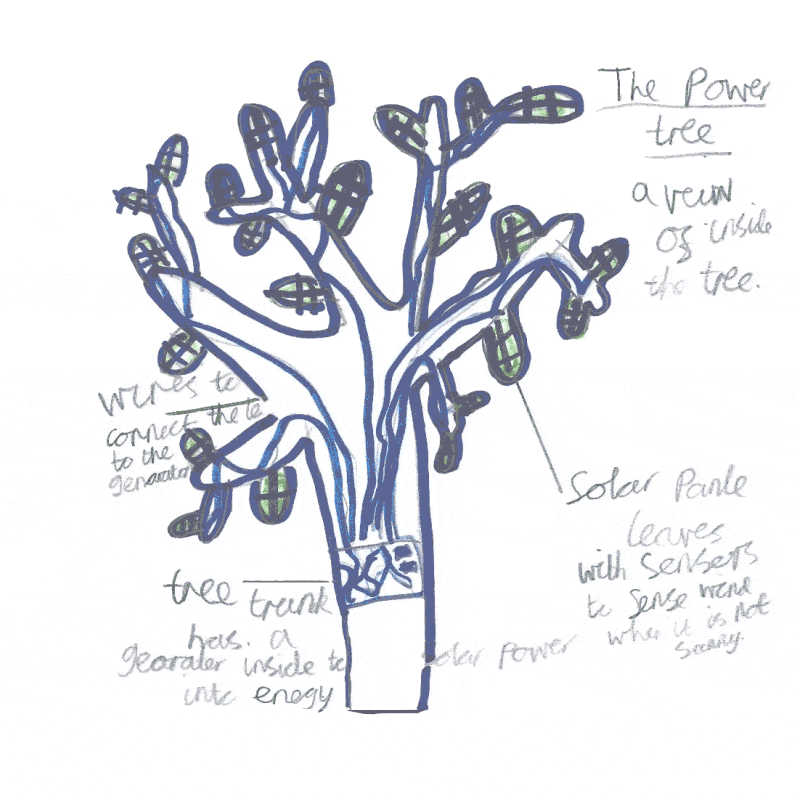
Power Tree
This idea has been brought to life

I'm an Animation student in my final year of study, specialising in 3D animation and character design. I love creating stories within animation, and having a unique and aesthetically pleasing style that engages my audience!
I design stuff for people to make and sell to other people!
Working with Octo Design, I’ve created products for lots of very different companies.
I'm a product designer with a keen interest in the creative process. That means I’m often involved in projects from day one, helping to shape those initial seeds of ideas through to something compelling.
I'm also a mechanical engineer who likes to make things. That helps me work out how things will work and how we can make them a reality!
Honey came up with The Power Tree as a way to minimise the space that flat solar panels need. Her invention frees up countryside land for nature and farming, and also contributes to a more natural looking landscape. We also think that it would be great to see Power Trees in our cities. Honey took part in the challenge at a workshop at Seaton Valley library.
Blog entries

I had a great chat with the Power Tree’s inventor, Honey – she had made a model of the tree, and we talked about how she came up with her idea. I shared how I planned to make her idea real, and everyone involved in the video call was excited to see how it comes together!
So.. over to me to make it happen.
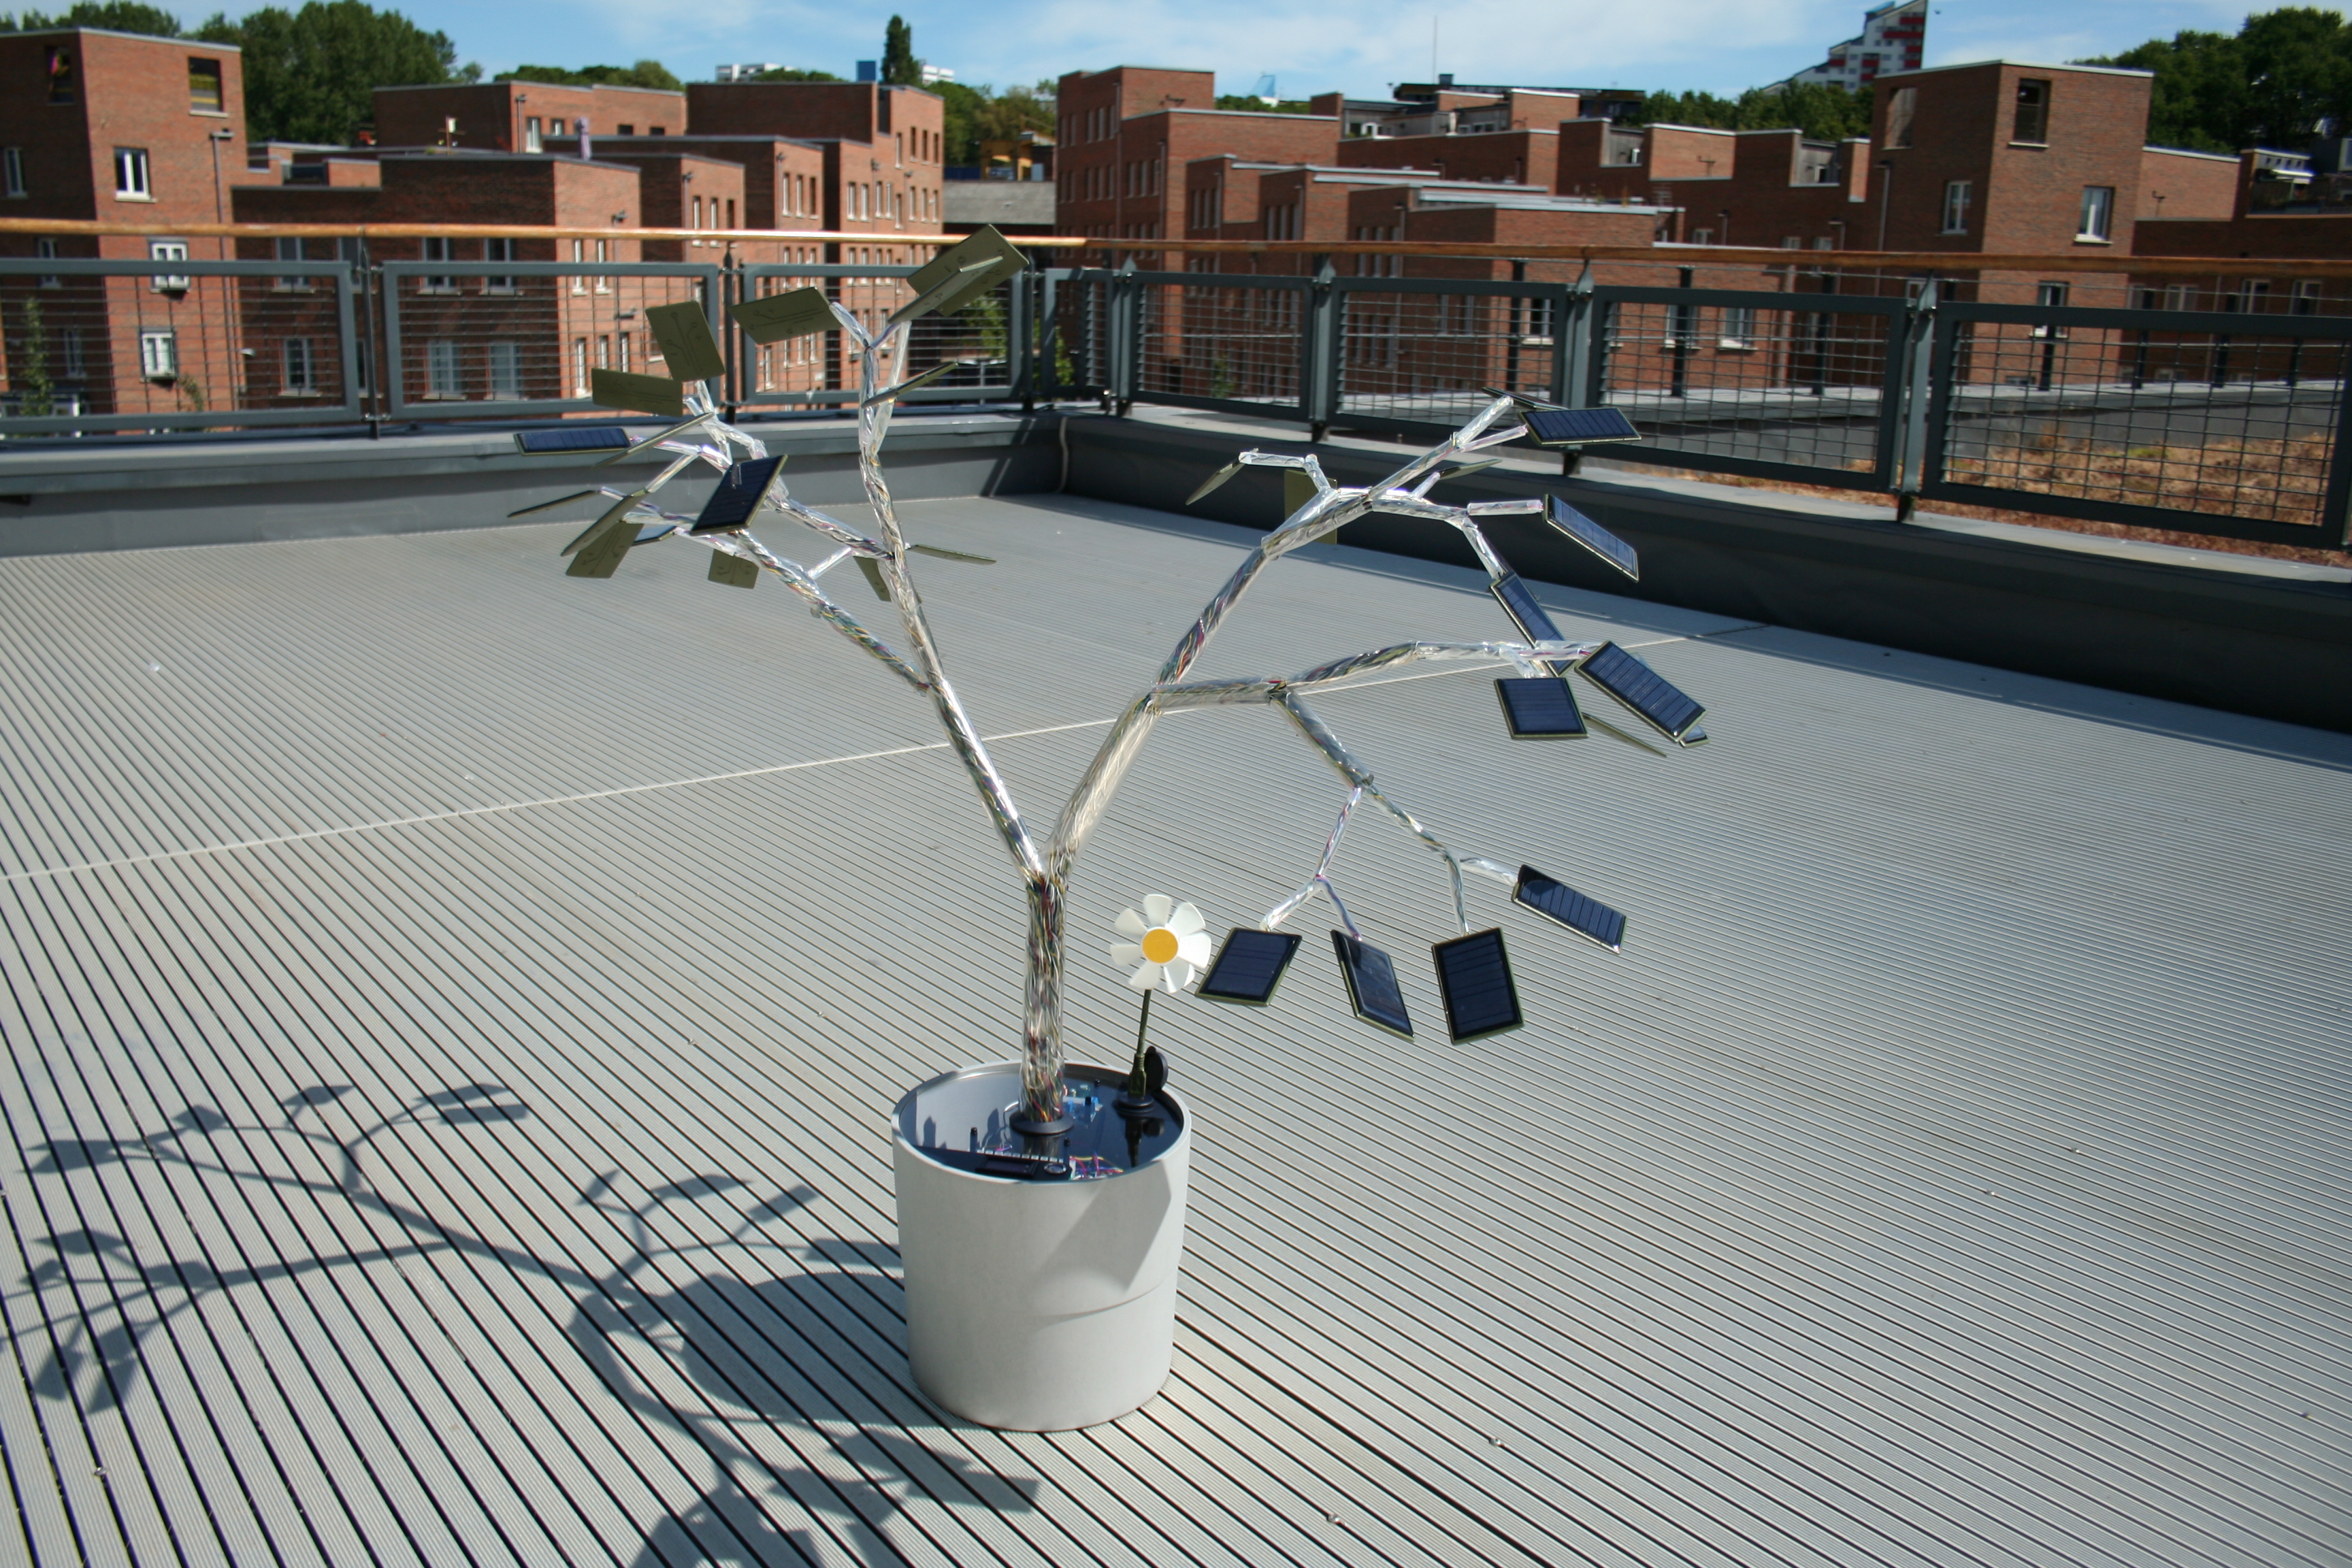
I’ve had a busy 2 weeks bringing together all the different bits I’ve been working on. I’ve been sanding and spraying solar panel mounts. Gluing wires into them. Solder wires for solar panels. Thermoforming branches. Twisting metal wires to give the branches strength. Designing, cutting, masking, and spraying a plastic cover for the generator. Figuring out and wiring the generator. Designing, 3D printing, and spraying a collar for the bottom of the tree. Putting it all together!
There was so much more than I expected, but it was fun to work on, and... it works!

After rendering, I take all my files into Adobe After Effects to do the finishing touches. This includes things like background details, editing transparency, and sounds. It's also where I add all my rendered images together. For this project I had 3 different layers, with the tree, hill, sun and moon on one, the clouds on another, and lastly the background on its own too. This was so I could edit things like colours and transparency without effecting the other layers, making it a much cleaner process.
I started off my bringing in all my rendered images to After effects, and organise them so they're ordered correctly. I then changed things like the cloud transparency, adding in the stars and making them twinkly, and also adding in the little "z" for the sleepy moon.
One of the things that brings a project together is the sound. I spent a while trying to find sounds that I felt were good quality, and also fit with the scene. The hardest sound to find was one to accompany the mechanical leaves opening and closing, and I ended up using the sound of a digital camera starting up, because it has a great whirring and clicking noise to it!
Now that I've finished the animating, I thought I'd share some close ups of the model with the "wireframe" showing. The wireframes are the lines on the model that shows the skeleton of how it's been made. It can be useful for seeing how many faces a model has, and also shows how it's been modelled.
In these photos I've also turned on transparency so you can see the wireframe, and the insides of all the models too, because inside the tree there's things like the wires and generator. Because I have wireframe on, you can see which parts are more simple, like the grass and the hill, and which parts are a bit more complicated, such as the generator and the leaves.
You can also see a picture of how the whole scene looks from a different angle, with the camera and the background. I chose to have the whole project shot from one camera so everything is designed to look good from one angle, which is why it looks a bit odd looking at it from a different perspective!
Lastly, you can see how I add materials to the models. I do this by selecting the model, and then adding a PxrSurface material. This means I can change the colour and finish on the model, like making the sun have a yellow colour with a matte finish.
Recently, I’ve been looking at the power tree’s generator and its’ leaves!
Generator -
The generator will show how much power the tree is making and convert it into something that we can use to power other things!
To show how much power is being created, I’ve included several meters that measure voltage and amps. These are two of the main ways of measuring electricity, and if you multiply them together you get watts a measurement of power (and light bulbs). This means we can use the meters to tell how powerful the power tree is!
I’m going to use lots of solar panels on the power tree so I’m including a clever little circuit called a “buck/boost convertor”. The buck/boost convertor will take all the power coming from the solar panels and create a consistent output. Exactly what I need to power things!
To show the power tree working I’m including a small fan that will come on when the power tree is in the sun!
Leaves -
I’m using 3D printing to create the solar panel leaves.
Each leaf will be joined to the tree by a stiff wire that runs down each branch. This means each branch and solar panel can be repositioned to best catch the sun. This type of metal wire structure is often used by animators for their models so they can create stop motion animation - they call them armatures.
The leaves themselves will be printed at Octo Design (where I work). We have a 3D printer, that we use for prototyping our designs before they are manufactured. Our printer creates 3D models by melting a liquid with a laser! It creates the model in slices, one on top of the other. Once the print is complete, it needs treating with heat and UV light before it can be used.
I created several designs for the leaves on the computer, before printing a prototype of my favourite. I was happy with the results, so I’m now printing all the leaves I need for the power tree. Once these are printed, I should have all the parts I need to make the power tree!!
The next step in this project is the fun part - animating! I really enjoy this part because it brings the creation to life, and you can start to see how it'll all unfold when it's rendered.
The most important parts of this animation are showing how the leaves open to collect the energy, and also seeing how it powers the generator inside the tree. I used the leaves I rigged up earlier and animated them uncurling when the sun comes up, and curling back up when the sun goes down. I also wanted there to be a difference shown in the type of power they collected, so I had the generator spin different directions depending on whether the power was solar or wind powered.
After animating, I did a "playblast" which is when you export the video as it looks in Maya, just to see how the timing all works before you render it out, as you definitely don't want to render out something wrong! The playblast looks a little confusing to people who don't use Maya, but you can still see how everything's going to move and work in the final video.
After I'd modelled out all the assets for the animation, it was time to add materials to them, which is what makes them colourful and textured in the final render. I used Pixar's Renderman to render out my work, which is what Pixar use for their animated films to make them look really beautiful.
I decided to give the tree a glass material so you can see how all the wires inside connect to the leaves, and so you can see the generator spinning as the leaves collect energy.
After I'd added all the materials, I rendered out a couple of frames from the day scene, and from the night scene to see how they'd look. I took them into Photoshop to add little details like the stars, as I'll be adding those in after I've done all the 3D work, and it's always good to get an idea of how everything will look before you render it all out.
I used the software Autodesk Maya to model the tree, and some basic aspects of the environment, like the clouds and the moon for the night time scene.
I followed my drawing fairly closely, but definitely wanted to do something special for the leaves as they're the most important animation in the video.
I decided to model and rig a leaf that would uncurl itself when the sun comes up, so it can open up to collect the solar energy! I did this by making the leaf shape, and then rigging it with some joints that allowed it to bend in certain places. I kept it quite geometric to give it a more mechanical look.
I loved the way Honey drew the Power Tree, and the lovely colours she used caught my attention, and I really wanted to make it!
I thought it was a very smart idea, and one that I can definitely see being produced in the future. I liked that it was both good for the environment, and also has a lot of design possibilities.
I wanted to make her idea into a 3D animation that loops, and shows how the tree responds in different types of weather, like in the sun, night time, and in windy weather. I began sketching out my designs in Photoshop so I could then use them as reference when it came to modelling. This is one of the most important parts of the project, as it gives me a really good foundation to work from when I start making it in 3D.
I’ve recently been looking at branches and solar panels for the power tree!
Branches –
After a little experimenting, I found I could make tubes for the branches by thermoforming sheet plastic.
Thermoforming, is where you heat plastic to make it bendy and hold it in a new shape. When it cools it stays in the new shape!
To make branches, I needed to find just the right thickness of material – thick enough that it will be strong, but thin enough that I can roll it into tubes. I found rolling the tubes like they roll paper straws made them very strong.
Next, I have to decide how to best join the branches!
Solar Panels –
I want the power tree to generate a useful amount of energy – so I’ve found small solar panels I can use for the leaves. To help me choose the right solar panels, I worked out how much power each one would give, and how many solar panels I thought the tree should have.
I bought some panels to test and found that the amount of power the supply varies a lot depending on the time of the day, and how bright it is. I, therefore, decided I need what is called a “buck/boost convertor”. This takes a varying power source, and creates a constant voltage – this can then be used to power things.
Next I will have to decide what to connect to our power tree! I could possibly add a battery, so we can store the power when it is sunny, and use it across the whole day.
In the times before Covid-19 lockdown...
I started looking at Honey’s amazing Power Tree idea. It has so much potential, I was really pleased to get the chance to try and make it real.
I was initially thinking about how it could be a huge, power generating tree or a smaller, desktop charging device. I realised the thing I make could help us explore both of those possibilities.
I decided to explore how we could make the power tree generate electricity.
Honey’s original sketch has leaf shaped solar panels. I found that solar panels can be made into lots of different shapes, although they are only readily available and mass produced in squares, rectangles and circles. This means I will have to think about how we can use standard solar panels to make leaves.
One of the aspects of Honey’s original sketch, I really liked was how she sectioned the tree so we could see the wires inside. We often do this with drawings and sketches when designing things, to help us explain how things work. For the make, we can achieve a similar effect by making the branches clear, showing colourful wires travelling down the branches to the generator.
I was also thinking about how a large power tree would probably be made from tubes like a wind turbine, using as little material as possible.
So. For the power tree model, I’m going look at transparent sheet material, rolled into tubes.
I then wanted to know what a tree would look like made from tubes, so I decided to make some prototypes. Prototypes are early, less detailed versions of the thing we’ll finally make. They can be as simple as a sketch, or almost as complicated as the final thing.
I initially made a computer model where all the tubes were the same size, with a repeating pattern (each branch splits twice). I think this shows that with enough branches and panels, we can make quite an interesting looking tree. I then made a paper model, where the branches/tubes get thinner as they get longer. I also thought this worked quite well.
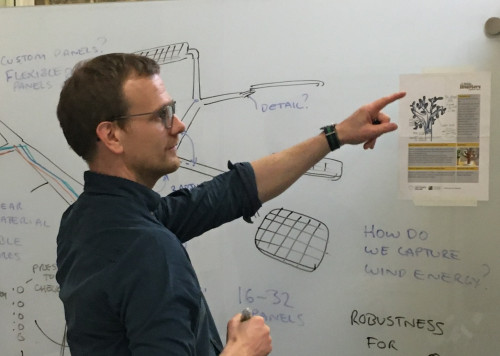
At this stage, I thought it was a good idea to bring what I’d be looking at into the Octo Design Studio, to share with the team.
There were lots of good ideas to help me make Honey’s ideas. I particularly liked the idea of using an existing plant pot as a base, and how we could create the generator in the trunk of the tree, like Honey’s sketch. I’m hoping to add something to the generator that will show when the tree is generating electricity.
Reviewing Honey’s idea in the studio, was actually the last thing we looked at as a team in the studio before the lockdown. I believe it’s still on the whiteboard now!
Since then, I had to focus a little bit on getting things setup to work from home, but I’m now moving things forward again. I’ll save those developments for another blog post!