Carys Lewis

Website:www.caryslewis.co.uk
Skills:3D Animation and modelling, character design, and bringing stories to life!
I'm an Animation student in my final year of study, specialising in 3D animation and character design. I love creating stories within animation, and having a unique and aesthetically pleasing style that engages my audience!
Recent blog entries
After rendering, I take all my files into Adobe After Effects to do the finishing touches. This includes things like background details, editing transparency, and sounds. It's also where I add all my rendered images together. For this project I had 3 different layers, with the tree, hill, sun and moon on one, the clouds on another, and lastly the background on its own too. This was so I could edit things like colours and transparency without effecting the other layers, making it a much cleaner process.
I started off my bringing in all my rendered images to After effects, and organise them so they're ordered correctly. I then changed things like the cloud transparency, adding in the stars and making them twinkly, and also adding in the little "z" for the sleepy moon.
One of the things that brings a project together is the sound. I spent a while trying to find sounds that I felt were good quality, and also fit with the scene. The hardest sound to find was one to accompany the mechanical leaves opening and closing, and I ended up using the sound of a digital camera starting up, because it has a great whirring and clicking noise to it!
Now that I've finished the animating, I thought I'd share some close ups of the model with the "wireframe" showing. The wireframes are the lines on the model that shows the skeleton of how it's been made. It can be useful for seeing how many faces a model has, and also shows how it's been modelled.
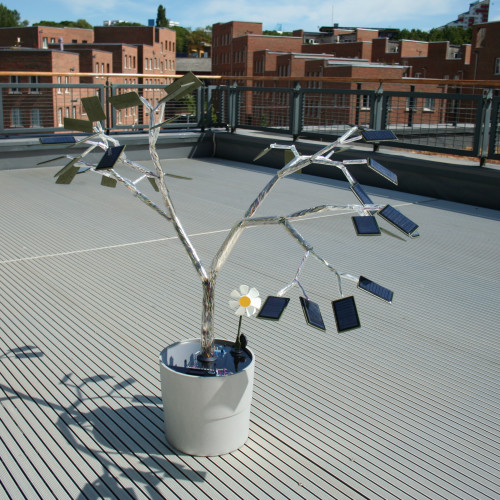
In these photos I've also turned on transparency so you can see the wireframe, and the insides of all the models too, because inside the tree there's things like the wires and generator. Because I have wireframe on, you can see which parts are more simple, like the grass and the hill, and which parts are a bit more complicated, such as the generator and the leaves.
You can also see a picture of how the whole scene looks from a different angle, with the camera and the background. I chose to have the whole project shot from one camera so everything is designed to look good from one angle, which is why it looks a bit odd looking at it from a different perspective!
Lastly, you can see how I add materials to the models. I do this by selecting the model, and then adding a PxrSurface material. This means I can change the colour and finish on the model, like making the sun have a yellow colour with a matte finish.
The next step in this project is the fun part - animating! I really enjoy this part because it brings the creation to life, and you can start to see how it'll all unfold when it's rendered.
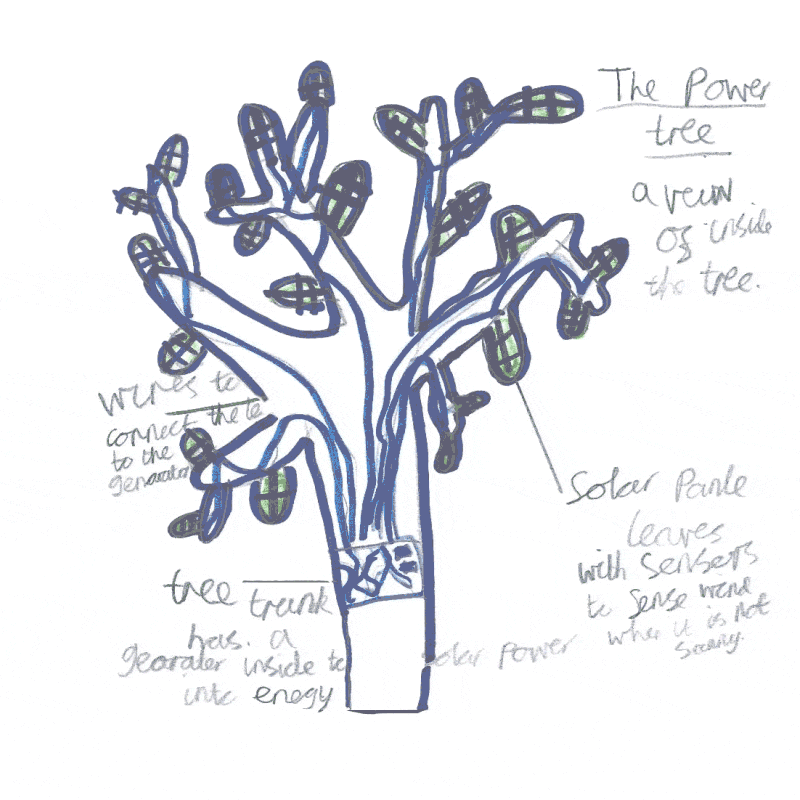
The most important parts of this animation are showing how the leaves open to collect the energy, and also seeing how it powers the generator inside the tree. I used the leaves I rigged up earlier and animated them uncurling when the sun comes up, and curling back up when the sun goes down. I also wanted there to be a difference shown in the type of power they collected, so I had the generator spin different directions depending on whether the power was solar or wind powered.
After animating, I did a "playblast" which is when you export the video as it looks in Maya, just to see how the timing all works before you render it out, as you definitely don't want to render out something wrong! The playblast looks a little confusing to people who don't use Maya, but you can still see how everything's going to move and work in the final video.