The Sun Cube
This idea has been brought to life

I've loved making things since I was a kid, which led to me studying electrical engineering and having all kinds of "maker" related hobbies, from 3D printing and electronics to glass work. Professionally, I spread my love of science & engineering through Let's Talk Science's outreach program. I love sharing my passion for understanding how things work and creating new inventions with kids across Canada, and giving other volunteers the tools they need to share their passion too!
Maintaining a normal routine is one of the big challenges for our astronauts in the International Space Station - with sunrise every 90 minutes as it orbits the Earth, it can be quite tricky! The Sun Cube aims to help regulate cycle by mimicking the normal pace of a day on Earth, with the added bonus of comforting images to make our astronauts feel more at home.

Blog entries

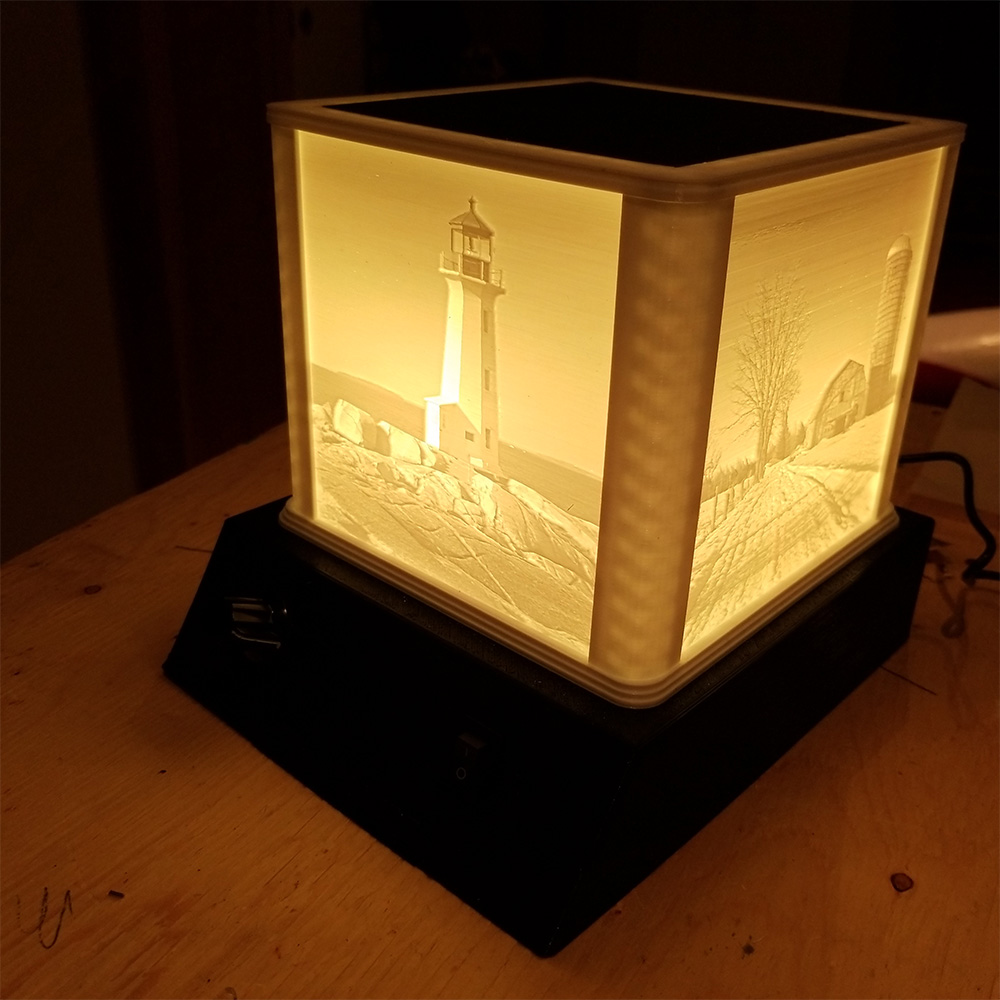
While I was working this week, I made sure to print all the pieces I needed for the final version. I needed to reprint the base, because my first design was too small to accommodate the big selector knob, and I needed to reprint the sides of the cube, because they weren't perfectly square, which left a bit of a gap at the top of the cube. Finally, today, I was able to assemble all these new parts and give it all a test run. I'm pretty happy with how it's shaping up! You can see a few pictures of the different colors below, and a video of the suncube going through a demo cycle, which simulates sunrise, daytime, sunset and nighttime within a 2 minute period. I also tested a the 90 minute ISS cycle while watching a TV show, and, I'll leave the cube running overnight and tomorrow to test out a full 24h Earth cycle.
Soldering went pretty well. First, I drew up a careful circuit diagram, to make sure I had a good reference to work from, in case anything went wrong (picture). Secondly, I laid out all the main components on a perforated board - you can see them in the picture: the Arduino, the MP3 player, the clock (with a battery), 4 transistors, and some resistors. After that, soldering went pretty quickly. I did have one bad contact, but it wasn't too hard to fix. The spaghetti mess has been tamed!
While my last few pieces are printing, I can't delay the unavoidable much longer... it's time to transform the spaghetti mess you see in the picture into a neatly soldered circuit. Wish me luck!
After almost a week of printing, I can test assemble most of the sun cube. In the process, I realized the constellation didn't light up as brightly as I wanted to, but that was easily fixed by replacing the single LED with a bit of the ultrabright RGB LED strip and making it light up white. I'm pretty happy with how things are turning out, so I shot a video to show you.
During the nighttime, the cube won't be lit. To make things interesting, I thought I'd have a constellation twinkle on the top face. So today, I design the top constellation panel. I found a picture of my favorite constellation, Orion, and traced it in a CAD program to make it into a 3D shape. Then I printed it, and holding it up to a window, I think it's going to look pretty good!
For the last week or so, my 3D printer has been going pretty much non stop! This video shows it printing one of the sides of the cube.
Today while I was working, I printed the first lithophane, a lighthouse from a small but famous town - Peggy's Cove in Nova Scotia. I tested it with the RGB LEDs, and I'm pretty happy with result (see video)... you can see the picture clearly when the lights are on, and there is a nice sunrise/sunset effect when the colors of the lights change. Great! I'll print the other lithophanes over the next few days.
On the electronics side of things, I received the 4 position knob that I want to use to select which day to emulate... Earth, Beta Pictoris, the International Space Station, or a quick 2 minute demo. I added it to the circuit. I also tested out my power source. So far I've been powering the project with my workshop's power source, but to make the project stand-alone, I'm using a recycled power adapter. It works well, so I would say the electronics prototyping is pretty much ready! I think I'm going to finish the 3D printed parts before soldering the circuit permanently, just in case I change my mind about anything.
Today I added another lighting effect to the project. During the nighttime phase, I think it will be a little boring if the cube is just dark... so I thought we could have some constellations with twinkling stars on the top face. I spent a lot of time trying to hook up a bunch of LEDs, and trying to have them twinkling independently, but unfortunately, I'm starting to run out of outputs on my Arduino board. I had to settle on a single twinkling LED (see video). I'm going to make some holes in the top face and the single LED will shine through those holes, simulating a bunch of stars. I tested out a prototype with a piece of cardboard with holes in it... I think it's going to work. I'll do a 3D printed version and we'll see!
I'm at the point where I can't progress with the electronics anymore until I receive a few more parts. So, after updating my checklist, I moved on to the 3D printing part of the project.
I also spent some time going through pictures on my computer, to pick 4 nice landscapes to make the 4 lateral sides of the cube, that will look nice when backlit with sunrise and sunset colors. I narrowed my choices down to five options. I'll print all of those as lithophanes and see which ones turn out the best. I'll also ask Arashdeep if he wants to send me a picture that he'd like to have on one of the sides.
Finally, I started to set up some of the 3D printing files I will need to build the cube: the structure (vertices) of the cube, and the lithophanes. Lithophanes are 3D printed panels based on pictures. Even though the entire panel is printed with one uniform color of plastic, the darker areas of the picture are printed thickly, and the lighter areas are printed thinly - this way, when you backlight the panel, the picture appears.
Today I spent a couple of hours combining the lighting effects with the sound effects. I spent quite a bit of time on iTunes finding 4 sound files to represent dawn, dusk, the daytime and nighttime. I wanted to find soundtracks that were longer than the demo sounds I used in my first prototype, so that it wouldn't sound repetitious. I then combined my two programs, which in principle, sounds easy, but unfortunately, in the process, I inadvertently erased my lighting program, so I had to redo it... these things happen! The rest of the time was spent cleaning up my code a bit to make it easier to manage and keep track of. For example, thinking towards the future, I know I'll want a way to change the length of a "day", and I might want to experiment with what proportion of the day is spent in the sunrise and sunset states. Once I was happy with all that, I shot a video to show you my progress (see below), and took a few notes about the next steps I have to work on. One part that will be challenging, based on the way the MP3 module works, is to make the sound fade in and out when the tracks change... so I decided to end on a high note and go out for a bike ride!
Now that I've got at least a prototype of the lighting symbolizing different times of day, I want to try out the sounds. I spend a little bit of time finding some sounds that represent the daytime and the nighttime. I settle on some birds for the daytime, and crickets for the nighttime - there are lots and lots of crickets where I live. I'm using a little MP3 player module that I"m familiar with from my previous project, it's called teh DFPlayer. I hook it up to a recycled speaker that looks very similr to the one Arashdeep drew in his original invention sketch. I hook the module up to the arduino. For now, I'll use some wires as play, pause, and next buttons, just to test out the basics. I download the song on a microSD card that is tiny like a fingernail, and insert it in the DFPlayer. Hmmm, I hear a lot of static... a few web searches later, I realize that a lot of people have that problem with the DFPlayer and it's easily solved by adding some resistors to the speaker. I'm pretty thankful that Makers are so keen to share tips and tricks online! It makes things a lot easier, compared to when I was a kid without internet, who had to figure things out on my own! Anyways, once that problem is solved, I'm pretty happy with my daytime and nighttime sounds (see video). My cat Scrappy is pretty interested in this part of the project... all those bird and cricket sounds... it's hard to keep him away from the circuit! In the final invention, I'll want longer soundtracks (these are less than a minute each...) but this is okay for a prototype. It's pretty late so I'll leave things at that - tomorrow, I'll try to synchronize the lights and the sounds together, for the full effect.
My 3D printer is currently busy with another project, so I decided to start with the electronics. First, the lighting. I hooked up the RGB lights to an arduino usin gsome powerful transistors. Each light in the strip is made of three small LEDs (light emitting diodes): one red, one blue, and one green. The arduino can control the brightness of each LED. So, by mixing different amounts of each color, I can get any color of the rainbow. I spent a little bit of time watching sunrise and sunset timelapses on Youtube to settle on a color scheme - finally, I decided that sunrise would be purple, then pink, then orange; the daytime would be yellow; and the sunset would be the reverse. I whip up a quick program and test out my simulated sunrise, daytime and sunset... I'm pretty happy with it for now. Check out the video and see what you think.
Today I ordered most of the electronics that I'll need to make this invention. I try to recycle parts as much as possible, but I still needed to order some LED lights that change colors, and some transistors that are powerful enough, to give enough current to all the LEDs I want to use. While waiting for the parts, I sketched out the sun cube prototype. I also started to think about how the invention will be displayed. I'd like people to be able to see how the Sun Cube changes colors throughout the day, but I don't think they'll want to look at it for 24 hours! So I did a bit of research to see how long the day is on other planets. I found out that none of the planets in our solar system have very short days. The planet with the shortest day, among all the planets we have discovered outside our solar system, is Beta Pictoris, and it has a sunrise every 8h hours... that's still more time than most people would like to see a Sun Cube demo. Finally, I looked at the length of the day on the International Space Station... and that is just 90 minutes! The astronauts see a sunrise every 90 minutes... that's a pretty good amount of time. So I will probably have an "Earth" mode, and a "ISS" mode. This way, the astronauts' families on earth could also use a Sun Cube to know whether it's daytime or nighttime for their astronaut. I might also make a shorter demo mode for people who don't have the patience even for an ISS "day"! During my research, I also learned that sunrise and sunset have different colors on other planets, so that could be something interesting to incorporate in the invention if I have time.
Over the last few days I have been looking at inventions online to find ideas that will help me build the Sun Cube. First, I think about each problem I need to solve to make the cube: (1) I need to build a translucent cube (2) I need to light it up from the inside, on a timer of some sort (3) I need to play some nature sounds, on a timer (4) I might also think of other ways in which the cube can convey daytime and nighttime. To build the cube, one idea I found is to use 3D printed lithophanes, like this: https://www.thingiverse.com/thing:2763470 . I really like this idea, because it opens up some possibilities like displaying some landscapes or pictures that will help the astronaut be reminded on a nice day on earth. In that project, the inventor also used RGB lights, which can turn different colors... that gives me the idea that I could maybe use different colors to look like the sunrise and sunset. To play sounds, I think I am going to use a similar device to what I used in my previous project (The Family Talker: https://www.littleinventors.org/ideas/family-talker/details). It's a little MP3 player that can be controlled by an Arduino (picture below). It worked well, and I already know how to do it. While researching these solutions, I also came up with some additional ideas to make the project extra special but I will keep those as a surprise.
I've been looking at the inventions being submitted by Little Inventors across Canada, for a while. There are a lot of great ideas, and I can't wait to bring one to life. When looking for an invention to bring to life, I look for ideas that are a good match to my skills (electronics, 3D printing, stained glass) and that are creative (that's always more fun!). One of the ideas that caught my eye this time was the Sun Cube, an idea from Arashdeep. It's a creative idea, and I think it would be useful for astronauts both to help them sleep, and to help them feel connected to their family. I really liked that Arashdeep thought about how the invention might be brought to life - he include an Arduino (a small computer-like board) in his sketch, and I agree that's a really great way to make this invention come to life. I'm very excited that Little Inventors assigned this invention to me. My first step will be to research related inventions online to inspire the different parts of the design.