The Fish Light
This idea has been brought to life
Visit our online exhibition Mission: Protect our oceans to find out more about how the The Fish Light was brought to life!
Blog entries

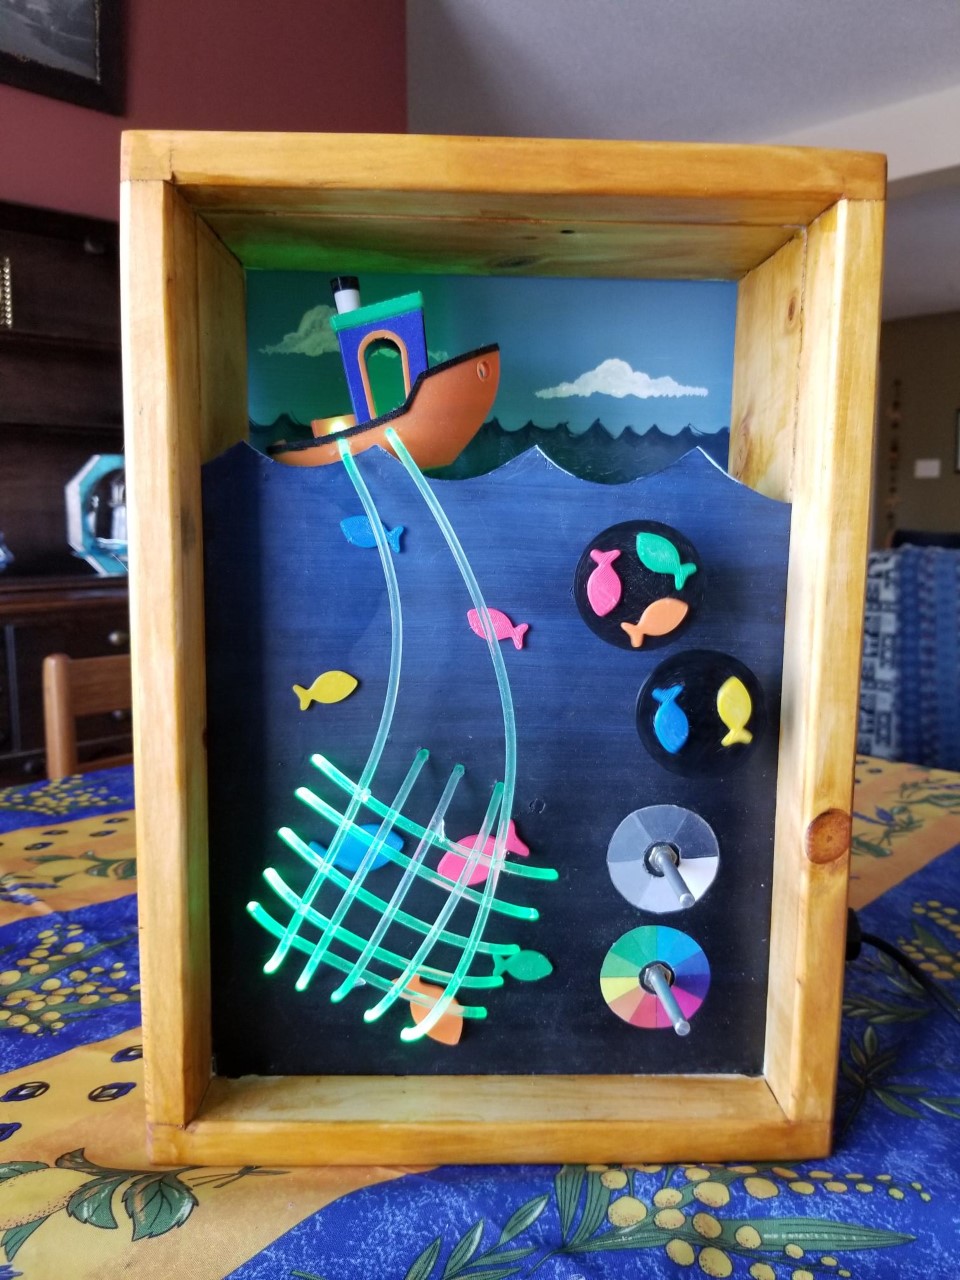
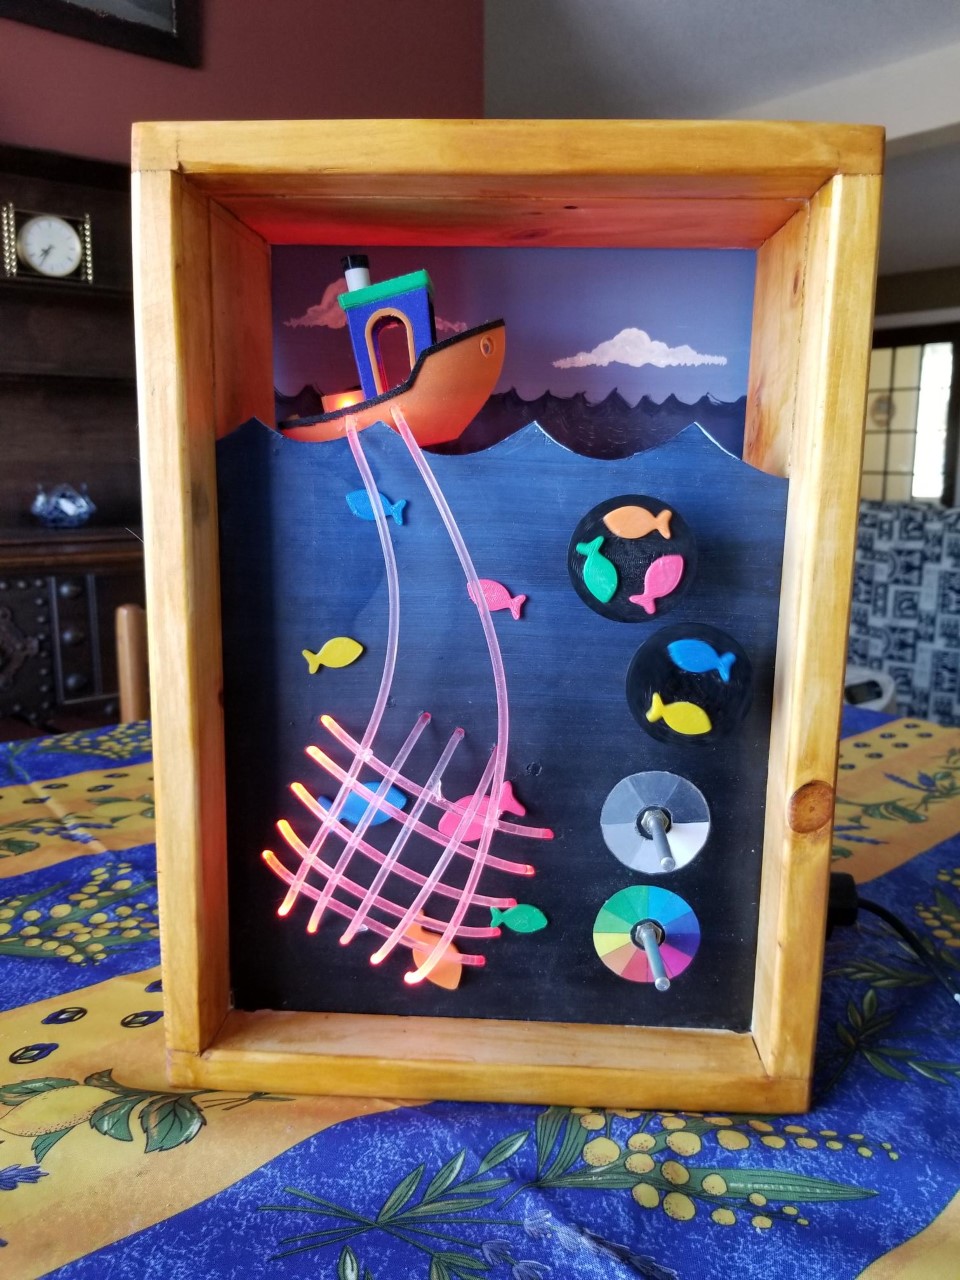
After a good nights’ sleep, the frame is set and I can unclamp it. It feels like the home stretch now! I sand down the frame and stain it using shellac. I glue the fish (some big ones inside the net and some little ones escaping from it) and some dials to indicate brightness and color, just like Onna’s original picture. Finally, I paint a backdrop of waves and clouds – I think it gives some nice dimension to the project! Time to do a final test – you can see it in the video. I’m very happy with how this project turned out, and Scrappy the cat seems to approve (you'll see a picture of him giving his final inspection below). I love how colorful the final object is, and I think I have captured the main features of Onna’s invention. I hope she likes it to!
As I enter the home stretch, there is a lot of miscellaneous printing that needs to happen. Onna suggested showing how the big fish stay stuck inside the net while the smaller fish escape. So, I find a SVG file of a fish online, and print a bunch of small and big fish using bits of colorful filament, to replace the felt fish I had made earlier just as a proof of concept. I also print a few more brackets and start gluing stuff together. While things are printing, I glue the frame together using wood glue and clamp it down so it can set overnight.
It’s a well known fact in project management and in making that the last 20% of the project takes 80% of the time!
Onna and I both agreed that it would be cool for the boat to be “cartoony” to match the fun colors of the project. I want to make it very colorful, and this is a really great opportunity to use multi color 3D printing. The thing is, I’ve never been able to get the multi color printing attachment to my 3D printer working properly – it’s a pretty complex upgrade, with a lot of part that all need to be adjusted just so and work together seamlessly. Most of my 3D printing is functional parts… thing like brackets, repair parts, wheel, etc – for which color doesn’t matter, so I haven’t had too much incentive to figure it out. Sounds like the time is now!
It takes me about a week, including a lot of online research and a lot of chatting back and forth with tech support in the Czech republic (where my printer is made) to figure it out, but finally, it’s working. The video shows the process of switching between colors. When the video starts, the printer is printing green and it needs to switch to blue. Before switching to blue, it needs to get rid of the remaining plastic that’s already melted in the extruder chamber. That happens on the side – on something called a purge tower. You can see the printer head moving off to the purge tower on the right. Next, the green filament retracts up the white/transparent feeder tube. It’s being pulled by a gear at the top of the printer. Then, the filament selector moves to the right, moving the feeder tube in front of the blue filament. A different gear grips the blue filament and feeds it into the tube. When it gets detected by an infrared sensor need the extruder, the extruder gears grab it and start to feed it into the extruder. Of course, there is still a bit of green filament in the chamber, so at first, the filament coming out of the extruder would be a mix of green and blue. So the printer purges that mixed filament into the purge tower. And then it resumes printing the boat. This happens hundreds, if not thousands of times during the printing of the boat. I’m really happy with the result and very happy I’ve conquered multi-color 3D printing!
Today I had a videocall with Onna, the little inventor who drew the Fish Net, to show her the progress I have made with bringing her invention to life, and to get her advice and input on the remaining parts of the invention. I have a great time meeting Onna and her family. I really enjoy hearing about how motivated she was to come up with a solution to the environmental problem of overfishing and how she got the idea of using color in the net. Onna looks happy with how I am bringing her invention to life, and we brainstorm the next steps, for example what the boat should look like. I really enjoy meeting Onna, and seeing how she is already a maker herself and adding to her skills rapidly. Pretty soon, she will be bringing her own drawings to life.
Next comes one of my favorite parts, soldering everything together. I love soldering although it’s always a little bit nerve racking to take apart the working circuit on the breadboard and put it back together as I solder. Compounding my nervousness this time is that right at the moment when the project is taken apart in a hundred pieces, I hear that my videocall with the Onna, the little inventor who drew the Fish Net, will be in a couple days! I’ll have to pull a few late nights to make sure I have the invention in a decent state to show her on Friday! Fortunately, once everything is soldered, I plug it in and find out that this time is one of the rare times when everything works out the first time…
The last piece of electronic interfacing I need to do is to attach the fiber optics to the LEDs in a sturdy way. When I was researching this aspect online, I noticed that many makers have issues with that. I design a 3D printed bracket that fits the fiber optics snugly on the LED ribbon. Once the LEDs and fiber optics are mounted, it’s time for another “milestone” test! I plug everything in and I am very, very happy with the result… the net shine even brighter than I hoped, the colors are really vivid and I’m excited to show the invention in progress to Onna. As a last touch I add some quick felt fish to the servo as a prototype of what the animated fish could look like.
One quiet evening that I have just a couple hours to put into the project, I decide to work on the background. I cut out some cartoony waves with my scroll saw and paint the ocean a dark blue, getting darker the deeper it goes, to make sure the fiber optics stand out against the background. I make a huge mess in the process of course but I’m pretty happy with the result.
At this point I try out my pulley system, in hopes of animating a some of the fish in Onna’s design – some motion really makes the invention come alive. Unfortunately, I can’t get my pulley system to work… the elastics are either too tight, in which case axle’s friction is too high, or too loose, in which case the elastic slips. After getting some fresh air to clear my head after having a bit of a frustrating time, I decide to switch my approach and use some gears instead. I dig out some gears from an old lego set, the easiest solution at my disposal, and it’s very easy this time around to get my system working. Once that’s done, I’m able to mount everything to the frame and have a good test run of the electronic and mechanical parts of the system… fingers crossed… and everything works! It feels like I’ve reached a good milestone. Next week it’ll be time to make things more permanent.
This weekend, it’s time to make the wooden structure that will make this into a permanent object. Wood frames, boxes and so on used to be a part I dreaded when it came to making objects… although it can seem old fashioned to make things out of woo, it can be a very useful material, especially in situations that call for bigger structures than are feasible through 3D printing. Plus, wood is lovely . This all motivated me to take a woodworking class last year and although I have a lot to learn still, I feel better equipped to tackling this part of the project. I decided to make the frame around the invention out of pine, and use light presswood to make the inside surface. Although it’s probably, overkill, I decide to use dovetails to join the 4 sides together. Dovetails are kind of like puzzle pieces – they take a lot of skill and attention to detail, but they are beautiful and solid. Plus they give me an excuse to use my Japanese saws! These are special, very thin saws that cut through wood in no time. Along with a mallet, a chisel, and a good movie, the day zips by and I complete the frame.
Next, I use my router to make a thin slot on the inside to place the presswood backing, and drill out some holes to insert the fiber optics that make up the net, some dowels that will make the fish spin around, and some potentiometer knobs.
Now that the electronics are working, I place an order for some more fiber optic cables, and switch gears to designing some of the 3D elements I am going to need to assemble the design. I am going to need a boat, fish, pulleys, a servo mounting bracket, some brackets to attach the fiber optics to the LEDs, some bushings and other attachments. When I first got my 3D printer, I didn’t realize that brackets would be my most common use for it! But it’s one of those things where being able to make a custom part is super handy. So, I get busy designing everything on Autodesk Fusion 360. For example, the video and pictures below show the design process for a bracket that will allow me to attach a dowel to the servo so that I can make all the fish spin.
Once I have the color selection working, I add a second knob, to mimic Onna’s design, that controls the overall brightness of the lights. Basically, it acts like a dimmer.
At this point, I have the basic electronics of Onna’s design figured out, and I can start to think about a few enhancements. Dominic suggested maybe the fish in Onna’s sketch could move, and I think that’s a great idea – I can do that with a servo. I find a continuous rotation servo in my parts organizer. I brush up a bit on how to power up servos and how to control them with Arduino, but it comes back pretty fast. I solder up a little power supply for it, and hook everything up. It works as intended! The prototype of the electronic “guts” is pretty much done, and it looks like spaghetti, but I’ll clean it up later. I’ll also add a few pulleys later so that with that single one servo, I can spin around lots of fish. For now it just spins a little piece of tape so that I can adjust the speed.
My color-cycling program is fun and might be useful as a demo mode when the invention is on display, but Onna’s invention calls for two knobs that control the color and the brightness, so my next step is to modify the Arduino program to make sure a human can control the colors in that way. I am going to use two knobs like Onna shows on her picture – the knobs are called potentiometers, and basically when you turn them, they let more or less current through them. The Arduino can (indirectly) detect how much current is going through. I am going to use this principle to make the Arduino control the colors and brightness.
With a little bit of internet sleuthing, I find a neat color chart that shows the red, green and blue values of the twelve primary, secondary and tertiary colors: https://learn.sparkfun.com/tutorials/lilypad-tri-color-led-hookup-guide/all#custom-color-mixing-with-code . This is very handy! I modify my program so that it splits the “knob” into 12 areas. Once the Arduino detects which area the knob is in, it selects one of the 12 primary, secondary and tertiary colors and creates it by lighting up the correct combination of red, green or blue.
My next step is to test out the fiber optic and see if I am happy with the side glow effect. I test it with a few light sources and I realize that I am going to need something very bright to get the effect that I want to have – and I have just the thing. I think the RGB LED strip that I used for the Suncube is going to be perfect for this application. So, I gather up all the supplies I need… The RGB LED strip (a long ribbon of lights, that can light up any color of the rainbow), an Arduino (the “brain” that is going to control everything), and some transistors and resistors to help power everything. I make a test circuit and pretty quickly, I can light up the RGB strip. After some experimentation, when I hold up the fiber optic to one of the LEDs on the strip, I get a really nice side glow effect!
Fiber optics is the main thing that will be new to me in this project, so I start with that. I research fiber optics online a bit; most of the information about making with fiber optics seems to come from people who are using them to make clothing, which is pretty cool. Fiber optics use reflection to carry light from one end to the other, when I studied engineering in university, they were a big deal for telecommunication and computing. In those scenarios, you want to have as little "light leakage" as possibly through the sides of the fiber optic, but, in my research today I learn that there are some fiber optics with "side glow" that leak a bit of light on their sides, making the whole fiber glow. I think that will be even cooler for this project... I love the idea of a glowing net. I order a sample to try it out. Once it gets here, It's like a plastic spaghetti strand. I try it out against a RGB (color-changing) LED and it has a pleasant glow
I found out that I was assigned "The Fish Light" by Onna as the invention I'm going to bring to life. I'm very pleased because Onna made a very clear plan for her invention - maybe she'll be an engineer when she grows up! I think it will be a very colorful and fun invention to look at. Another reason that I really like this invention is that it hits the sweet spot - I have a good idea of how I will make the main features of it, so it's not too intimidating... but there are a lot of opportunities for creativity and bonus features, once I get the basics down. I think it's going to draw from some of the electronics that I have learned from my previous invention projects - for example RGB LEDs I learned to use for the Suncube https://www.littleinventors.org/ideas/the-sun-cube/details#tangible .
The first step when you get assigned an invention is to have a chat with Dominic, the chief inventor. We brainstorm some ideas on how to make the Fish light into a beautiful object - Dominic suggests maybe adding some movement to it and I really like that idea. I run an idea by him - making the fish net out of fiber optics - and he really likes it. Fiber optics isn't something I have worked with in the past but I'd like to explore them a bit. After our conversation I draw a first sketch of what the idea could look like if I made it with fiber optics and incorporated some movement in the fish.
I'm excited that it's finally time to choose my next project with Little Inventors! I've been keeping an eye on the inventions as they have been submitted by kids across Canada, and this time, for even more fun, I roped my dad into making an invention too. My dad got me into making in the first place - when I was a kid he showed me electronics, woodworking, and all kinds of things. He's always a sounding board for my projects, especially when they involve electronics, so I'm happy that he will also be contributing his own project this time. We both had a chance to look over the short listed ideas and pick our first choices. I wonder which one I'll be assigned to.