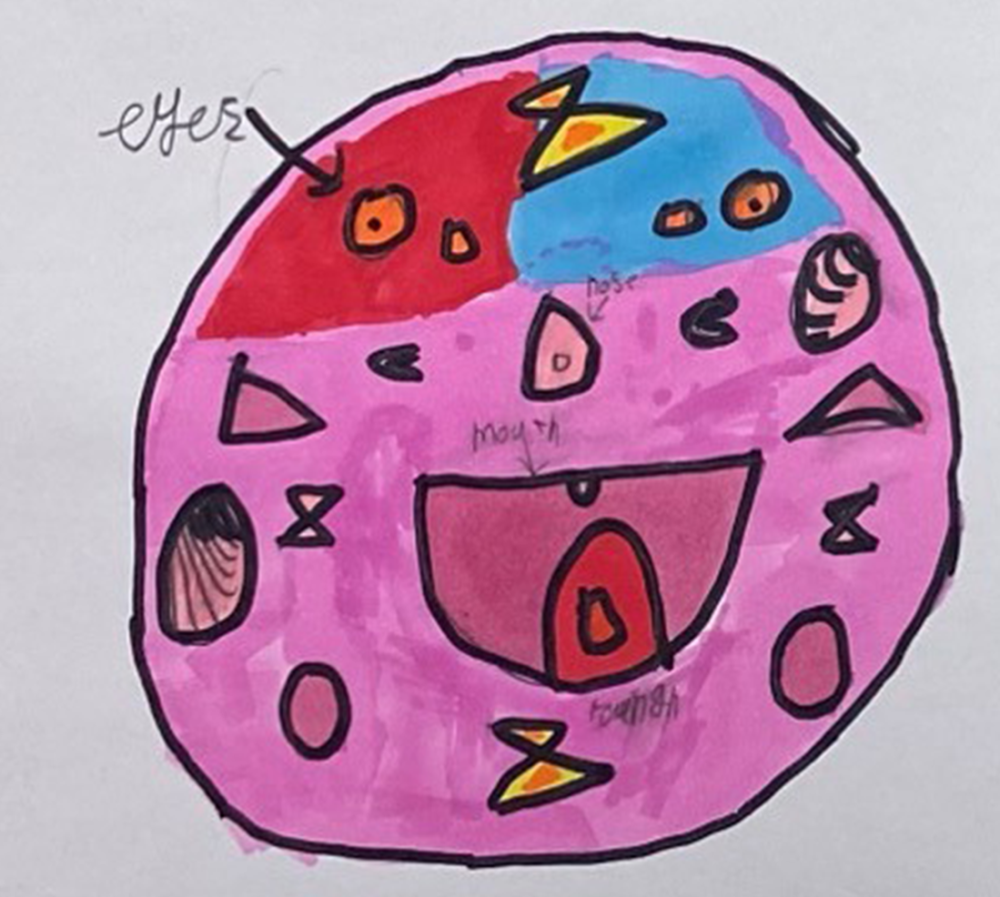
Circle ball
Blog entries
Once we had completed Circle ball, the 3D element for the poster was given more attention and soon later was completed too. With the poster and Circle ball completed, as well as the character completed too, we finally reached a point where all three components of the project were completed!
As we reached the end of our project, all that was left was to carefully place and glue the small components onto Circle ball. UHU glue was used to do so, as well as hot glue for the larger pieces that needed something that would dry faster and keep a strong hold. Small sticker jewels, seashells, etc., were also used to enhance the aesthetic of the product! We aimed to almost perfectely resemble Varsha's vision of Circle ball with the product we had produced.
Once the digital poster had been completed, it was decided that a 3D element was needed to elevate the poster. Therefore, a miniature half sphere was created through paper mache, and then once it was dried it was painted as well. Just like the sketch of Circle ball, there were also smaller shapes needing to be added around the sphere in order to make it complete as well.
Our intention for the main structure of Circle ball was to paper mache a 30 cm diameter styrofoam ball. However, we carved a mouth into Circle ball first to make the mouth resemble Varsha's drawing more closely. We gathered newspaper, PVA glue, water, brushes, as well as an empty counter, and we started the process of coating the sphere in newspaper. Then, once dried, a second coat was done. Finally, when both coats were fully dried and hardened, we started painting the entire ball pink as a base coat before gluing down the smaller components.
'Trash muncher', which is Varsha's green character for Circle ball, is what we understood as part of Circle ball's story/purpose. Therefore, how we visualised both of them was that Circle ball would be small enough to fit inside of Trash munchers mouth. It then would release Circle balls into the ocean to help clean up rubbish, and each Circle ball would increase in size after each piece of rubbish that has been picked up.
Trash muncher was created with cardboard. A clean-cut rectangular 3D structure was created through a carefully measured and sketched net that was done prior to cutting and gluing the sides together. Once the sides were glued together, the sides were painted green like Varsha's drawing, and a face was printed for Trash muncher, which was created digitally by Erin.
As a start, a sketch was made in order to break down how many small components there were around 'circle ball', as well as what kind of shapes there are. The small components were made from layers of cardboard. To make them large enough for the size of the styrofoam ball we had acquired, six layers of cardboard were glued together to make them thicker. After successfully creating all of the components, masking tape was used around all of them in order to smoothen the edges of them. Finally, oil pastels were used on the masking tape to add colour while keeping a 'sketching' texture.
In order to make sure the small components of the model were completed successfully and on time, we decided to take on three different tasks at the starting point of the project. I was in charge of the small 3D components around the model, Lauren was in charge of creating the character for 'circle ball', and Erin was in charge of creating a digital poster to present the project. Therefore, when it came to making 'circle ball', we were all able to work collaboratively.
After receiving Varsha's sketch of the 'Circle ball' invention, we decided to break down all of the specific tasks we would need to complete before our deadline. We decided to list out materials that we needed as well as materials that we already had but needed to remember to bring in. Additionally, we split up tasks between the three of us (Erin, Lauren and I), which allowed the project to be more manageable. This also allowed us to pay more attention to detail because each person had a main focus. However, we also planned to help each other by giving feedback and helping each other during the process when needed. Therefore, we all took part in every task while one person would lead each one. Our to-do list was as follows:
To Do:
29/02/24
- Character Done (Lauren)
- Small Details Done (Nadia)
- Poster Started (Erin)
07/02/24
- Poster Completed (Erin)
- Paper Mache Completed (Lauren & Nadia)
- Create a 3D element for the poster (Erin)
14/03/24
- Stick everything on
- Finalise any finishing touches