Walking Wardrobe
Blog entries
Exhibition day - all little inventors pinned up their A2 boards of their project round up and displayed their models. Waiting for the children to come view their invention brought to life.
I edited the walking wardrobe with a background where it would be used.
I finally had all the finished pieces and managed to assemble it altogether to achieve this walking wardrobe.
I assembled the wheels and legs together, to do this i firstly attached the wheels onto the wooden blocks, once dried i then attached the wooden dowel legs onto the wooden blocks. For the arms, i used the band saw to cut the wooden dowels to desired length, then spray painted it green.
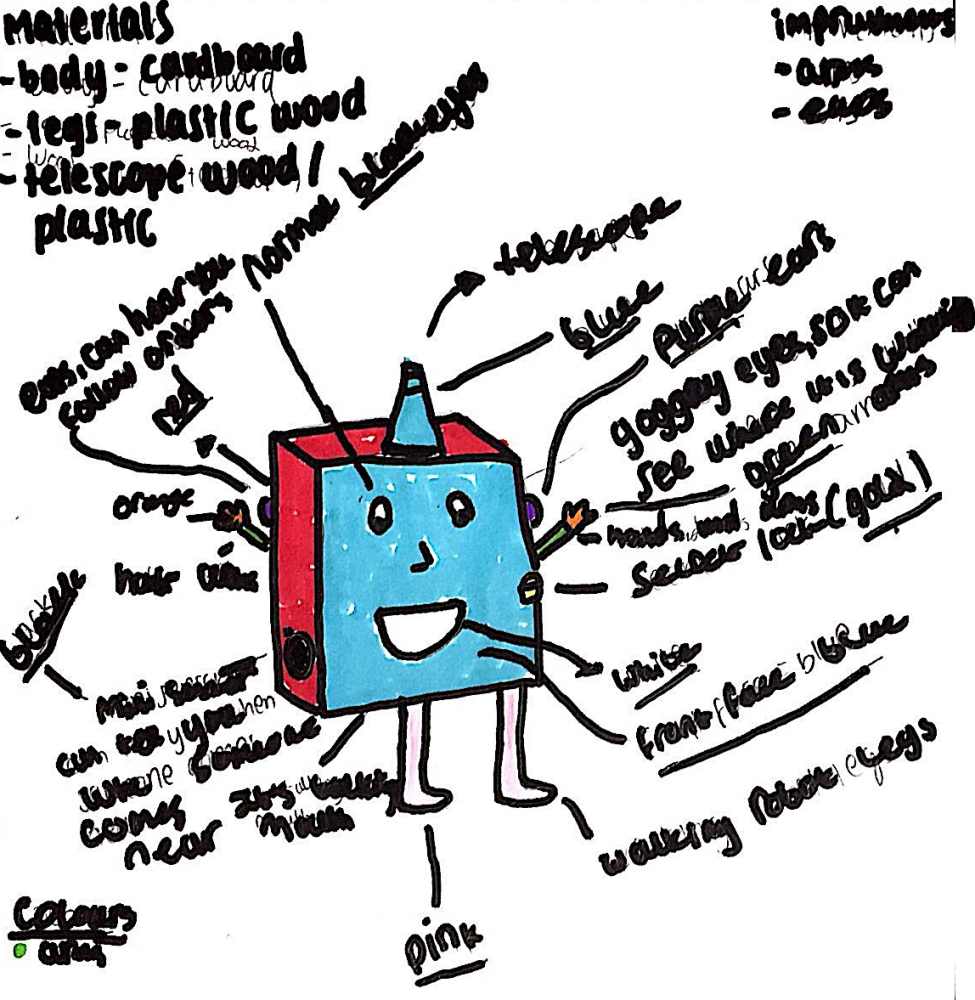
For the mouth, eyes and telescope lens, i firstly drew up many mock ups of my shapes onto illustrator to test which size was best suited for the walking wardrobe. I then sent off my drawings to laser cut onto acrylic to the laser cutter. For the eyes mouth and 'speaker' i achieved these by cutting out cardboard, stacking it up for a 3d layered effect. For the speakers i stuck down a laser cut lens. For the telescope i rolled up some card, stuck it together, line it up so it has a straight bottom to stick down well, spray painted it to the colour blue which Anisha asked for, then again adding a laser cut acrylic circle for a more real telescope feel. The ears of the walking wardrobe i found two rounded out of cylinders and spray painted it copper to stand out.
To continue with manufacturing, i firstly prepared the wooden dowels by sanding it down with sand paper, for a more smooth surface to sprat paint onto later. I then managed to set up a DIY booth in the garden to spray paint to protect the area i'll be i'll be spray painting in. I bought some spray paint, starting off with white to prime the wooden dowels and wooden blocks for the legs and also for the pink to show up more vibrantly with the white underneath, for the colour to pop. The process of spray painting, spray the first coat then leave to dry and repeated it until i was happy with the finish. After the wooden dowels and wooden blocks had dried i used a sanding sponge to achieve a smooth finishing on the dowels.
For manufacturing, i worked away in the prototyping room, marking out the wooden dowels where it needed to be cut and what length, same process for the piece of wood, mark out using the band saw to cut. However the wooden dowel was too long to fit onto the band saw, therefore i had to manually saw it down. After cutting the pieces of wood using the band and hand saw, the wood is a little rough with splinters, to get rid of this i used the belt sander to even out the surface, make it nice and smooth.
Since breaking down all the material i needed, i managed to go out to a few different stores to find the materials i need pretty quickly. I purchased thick wooden dowels needed for the legs of the walking wardrobe. I also managed to pick up wheels that turn 360, making it easier for Anisha to push/pull around, a flat piece of wood to cut up and coloured adhesive paper to stick onto the cardboard to decorate.
Before starting the project, i wanted to make it easier by breaking it down by listing all the pieces i would need. To do this i sketched up all potential pieces, what it would be made out of and how i would assemble them.